Monday, May 21, 2007

A Bit More Welding

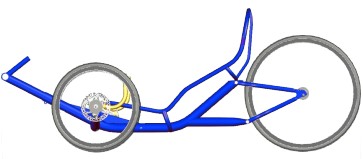
Today I tack welded the piece that extends from the back of the main tube. Took a little bit of re-doing to get it straight but I was rewarded because it is bang on now. This piece will be trimmed to length once I establish how high the rear wheel needs to be, and thus how the rear triangle lines up. This was a most satisfying task.

When visiting my sister and family on the weekend, I still haven't hinted strong enough for them to let me build a chopper bike for my nephew. One project at a time I guess ;) p.s. Thanks to Lara and Aidan for the bikes you gave us.
Posted by Picasa

Wednesday, May 16, 2007

More Bushing pics

Just a few more pics of the bushings after I notched them.


Posted by Picasa

Monday, May 14, 2007

Trike Riding


This weekend I met Tina in the little town of Bentley, Alberta to shop at one of Western Canada's best recumbent bike stores. Bentley Cycle and Trading Post has an amazing selection, especially in a town of 1000. For the first time in my life I got to ride a couple of recumbent tadpole trikes. I fell in love. Here is a pic of the one I liked the most: the TerraTrike Zoomer. Compact, light (30 lbs) and narrow enough to fit through a doorway without tipping. I must say it is a fun ride. Completely stable, very comfortable, combining the coolness of propelling yourself with the ride and handling of a go-cart. Really a shame they are $2200. Sigh.


Wednesday, May 09, 2007

Cutting the Inside Hole in the Bottom Bracket Tube Bushings

Last night I cut out the "Inside Hole in the Bottom Bracket Tube Bushings"

The first pic shows what didn't work: using a ground off wood bit and lathing it out with my drill press and cross slide. Cut not bad, but no way to measure.

2nd pic shows the was that worked. Put an end mill in the drill and rotate the bushing stock on a bolt bolted to a clamped piece of wood.

One bushing is PREFECT, the other is a hair loose, I may redo it, cause it is fun to make!


One bushing installed, one on the bench.
Posted by Picasa

Monday, May 07, 2007

More Than One Way to Skin a Bushing

Yes, that is a chisel clamped in the cross-slide and yes, I was wearing safety glasses. I started making the bushings for the bottom bracket tube tonight out of UHMW. I had been disappointed in the quality of the "cut" made by my hole saws, and they would have been a little to small anyhow. I came up with this solution: rough cut the bushing bigger than the final size, mount it in the drill press to spin it and then use my cross slide to clamp a chisel and turn it to final size like on a lathe. I was having a lot of chatter, but the I angled the chisel so that it was cutting with the corner only and it works great. With the cross slide you have excellent control and from the last pic you can see the fit is excellent! Now I will make one more and try to figure out how to accurately drill the hole in the centre.


Saturday, May 05, 2007

Bottom Bracket (That goes on the Front!)

The bottom bracket on a bike is the part that holds the bearing for the crankset (the gears your pedals are connected to). I was all set to start building the bottom bracket assembly for the trike when I discovered that the pipe I got didn't fit inside the main frame tube like it was supposed to. Close but not comfortably close. I thought, and discussed with Grant, my options like extending the slot that is needed to clamp this tube in place or using a pipe expander ($15 at princess auto). For fun I thought I would try just using the existing frame of the donor bike with some UHMW bushings, since if it didn't work, I could still switch to plan b, c or d. I was a bit surprised that it worked out better than I thought. I might just keep it. If you are wondering why there is the piece sticking up at a 60 degree angle, that is to mount the front derailer to and will be trimmed to be about 6 inches long. I can also use it to mount my water bottle (threaded holes already there) and my bike speedometer, head light, tow hitch, coat hook or snow plow attachment. You get the idea.


In the above and below pictures you can see other mounting holes that I could potentially use to adjust the length of the "boom" instead of a clamping system.

One thing I discovered is that although UHMW is great to cut, drill or machine, it isn't the greatest to cut with a hole saw. The saw gums up when it starts to melt. I will makes some better bushings if I decide to keep this design.

I like this picture because you can see the corner of that blueprint. Makes me looked organized or that I am going from a set of plans or something.

Any volunteers to draw some pedals and gears for the Progress-O-Meter?

Friday, May 04, 2007

Cutting the Rear Triangle Extention Tube

Ok, you gotta realize I am just making up part names now... But then again if you can come up with a better one.. it is the tube that is an extension of the main tube to connect to the bottom of the rear triangle. The rear triangle holds the rear wheel, and as Aidan is fond of saying, "the triangle is the strongest shape", or something like that. Ok here is what I did:

I had to cut a 2" grove at a 40 degree angle, so I drilled 2 guide holes in the 2" pipe at a measured 40 degree angle. I then cut with a hole saw using a guide made of a piece of a rod I salvaged out of a printer (that's a plug for gleaning if you didn't notice!). You can see I have started cutting from both ends as the hole saw only goes so deep.


Gack! you say, that's not lining up, how is it possible that the cut lines aren't going to meet properly??? Turns out it is an illusion. If you look at how the hole saw will intersect the tube, all will be ok. Trust me.

Here is the finished joint after a fair bit of trimming/fitting/cleaning up with a grinder.


Here is how it fits. Looks pretty nice I recon... Like I said, fair bit of fitting to get to this point. Notice my signature jiffy marker lines. If I want a precise mark I colour an area with jiffy then use a fine scribe, it works great!

A overall shot to show where this piece goes:


Friday, April 27, 2007

Tack Welding the Frame Tubes

Today I moved the welding jig out to the garage in prep for tack welding. Ironically all the work that went into the jig culminated in about 30 seconds of welding. Every fiber of my being wanted to just keep on welding and have it finished but I knew inside that the hardest thing to undo is something welded in the wrong place, even it only slightly wrong. In fact the entire bike will be tack welded until all the alignments can be verified and then the welding will be finished.


In my humble opinion this is the sexiest piece of metal I have had any part of making. How could you not drool over this?

Posted by Picasa

Thursday, April 26, 2007

Finishing the Welding Jig

Ok, today we finish the welding jig we started yesterday, we left off with the cross tube part of the jig finished:

Cut a hole for the main tube to fit through. Obviously not a precise hole.
.


Now screw 2 pieces of melamine together to square the piece the main tube will be attached to.


Butt the cross tub jig up.


Position the cross tube so it is centered on the main tube. Since the cross tube is now level, you just have to make sure the main tube sits down evenly in its notch. hmmm that reminds me I am not sure I checked that the notch is square to the main tubes bend, will have to check before welding...


Screw the cross tube jig to the piece the main tube is attached to.


We can now remove the piece used to as a square


Now we screw a square piece in the corner to square it that way (such precise words)


Now we fine tune where the main tube is sitting, this part should be level


Whoops! The table isn't level! The jig has to be moved to the garage for welding, so I will re-level everything there.


The jig is done! I feel like I should be doing a whole bunch of measuring to check everything, but that was the whole problem in the first place, no places to precisly measure from...


Wednesday, April 25, 2007

Starting the Jig for Aligning the Frame Tubes

Here is the start of the jig I will use to align the 2 frame tubes for welding. Today we deal with the cross tube.


Install a bolt in each end plate as a reference point.


Drill some temporary mounting holes


Screw on a 2x2 to the end plate.


Align the tube even with the bottom of a piece of melamine. the hole saw in the middle approximates where the next jig piece goes so it will line up with the pre-drilled holes


Nail the 2x2s in place.


The cross tube is now flat and level to the bottom edge of the melamine. Part one of the jig is now finished!


Sunday, March 11, 2007

The Cross Tub End Plates


This week I rough cut and drilled the cross tube end plates, tack welded them in place and trimmed the cross tub to match. The more I use my saw-z-all the more I like it! The mounting holes for the steering knuckle are tilted from vertical to set the caster of the steering to 12 degrees. Later the end plated will be trimmed to an oval shape around the small holes, but for now I decided to leave them untrimmed so that I can use the edge as a reference point for aligning tube tube to vertical when I weld it to the main tube.


Here is a pic with the rod ends that make up part of the steering knuckle stuck in to see how it looks.